Rennende vann og lukkertider

Fototeknikk

Når noen spør hva slags lukkertid man skal bruke for å få rennende vann til å se ut slik eller slik, blir svaret at det handler om mer enn lukkertiden, selv om den absolutt spiller en sentral rolle. Men hva kan det ellers være som spiller inn?

Farten på vannet er helt avgjørende, men som vi skal se kan farten på vannet være relativ i forhold til lukkertiden, selv om denne farten er konstant i seg selv. Det avgjørende er nemlig hvor raskt vannet beveger seg innenfor det aktuelle bildefeltet. Vi må derfor ta med i beregningen hvor «tett innpå» vannet du legger bildeutsnittet. Det er altså først når utsnittet er valgt for et gitt motiv at vi kan se hvordan de ulike lukkertidene påvirker hvordan vannet vil se ut.

På det første bildet er vi tett innpå et lite bekkefall. Der beveger en dråpe seg over en stor del av bildet i løpet av det halve sekundet bildet blir tatt.

I det neste bildet ser vi hele Mardalsfossen fotografert på lang avstand. Selv om vannet raser nedover med stor fart, rekker det ikke å bevege seg langt i forhold til bildeutsnittet i løpet av et halvt sekund. Jeg ville med andre ord ha vært nødt til å bruke en mye lengere lukkertid enn et halvt sekund for å få tilnærmet samme utseende på vannet i fossen som på vannet i bekken, dette til tross for at vannet i fossen mest sannsynlig beveger seg raskere enn vannet i bekken.

Vannets fart i forhold til lukkertiden påvirkes også av retningen på vannet i forhold til den retningen du sikter med kameraet. Et objekt som beveger seg rett mot deg vil befinne seg mer eller mindre på samme plass i bildet hele tiden, mens et objekt som beveger seg på tvers av blikkretningen vil bevege seg gjennom bildet, fra den ene kanten til den andre, med større eller mindre fart (som i eksemplene ovenfor). Dette betyr at vann i noen grad kan komme til uttrykk på forskjellige måter i ulike deler av ett og samme bilde. Det neste bildet er et eksempel på dette.

Bildet er tatt på 1/20 sekund og viser en bekk som renner mot fotografen, men verken rett imot, eller på tvers av, den retningen kamera sikter. I teorien vil den skrå linjen som bekken utgjør, og linjen fotografen sikter etter, møtes innover i bildet, mens avstanden mellom linjene øker jo nærmere fotografen man kommer. Dette betyr kort fortalt at vannet som befinner seg lenger vekk fra fotografen (A) renner mer rett mot kameraet enn vannet som er nærmere (B). Vannet i nedre bildekant renner altså mer på tvers av kameraretningen, og vil dermed også bevege seg over en større del av bildeflaten mens bildet blir tatt. Dermed blir farten på vannet nærmere kameraet større enn på vannet lenger bort, i forhold til lukkertiden. I tillegg vil også avstanden i seg selv spille en rolle, som vi så i de to eksemplene øverst.

Man kan derfor i prinsippet aldri gi et helt konkret råd for hvor lang lukkertid man skal bruke for å få vannet til å se slik eller slik ut, men det er selvsagt mulig å antyde hvor man kan starte ut fra gitte typer motiver, som for eksempel i det første bildet der lukkertiden var ½ sekund. Her er det bare å prøve seg fram til man får vannet slik man vil ha det. Så er det selvsagt viktig å bruke stativ når lukkertidene begynner å bli lange. Slå gjerne også av bildestabilisatoren når du bruker stativ, hvis den ikke har en innstilling for stativbruk.

Exposure explained by a Circle – Tutorial

Egne prosjekter, Fototeknikk, Fototeori

A photographer is a person who writes or draws with light. Hence photography is very much about controlling light. Photographs are made as a light sensitive material within the camera (the sensor) is exposed to light, and a good photographer knows how to let the right amount of light onto the sensor.

So exposure is all about controlling light, and understanding exposure is all about knowing how to make the available light into the right amount of light for the photograph you want to bag.

The Exposure Triangle
I assume you’ve studied the exposure triangle, still I don’t take this for granted in this article so don’t worry if you haven’t. The exposure triangle is a model for introducing and explaining tools for controlling the amount of light, among other things. These tools are:
The aperture: An adjustable opening, usually in the lens, for regulating the flow of available light entering the camera. The shutter: A physical mechanism or an electronic function that controls for how long the flow of light entering the camera is recorded by the sensor. The time span is usually referred to as «shutter speed» or «exposure time». The ISO-setting: An electronic function within the camera calculating the sensor’s «sensitivity» to light, an analogy to photographic film’s physical sensitivity to light.

The Four Section Exposure Circle
But there are actually more tools for controlling the flow of available light into the camera! These are the tools for controlling, influencing or even creating the available light itself:

  • Flashguns
  • Light panels
  • Lamps
  • Reflectors
  • Filters
  • Screens etc.

We are not going to explore this latter group of tools as such, but I find this group crucial to mention as I now introduce the four section exposure circle model (FOURSEC) where these tools belong to the section of lighting (representing the available light). The advantage of the FOURSEC model is that it links exposure to the very lighting situation, both directly and visually, a feature lacking in the exposure triangle model.

Hence we have four «entities» in the FOURSEC that together make up the exposure (the complete circle), fig. 1:

  • The lighting (representing the total of available light, natural and/or artificial)
  • The aperture (representing the opening regulating the flow of available light into the camera)
  • The exposure time (representing the time span for the recording of the light flowing into the camera)
  • The ISO-setting (representing the sensor’s sensitivity to the light flow)

Mutually dependent settings
These entities depend on each other. If you change one entity, you have to adjust one or more of the other three to maintain the same amount of light for your exposure. Say a cloud comes in front of the sun and you get less available light (the lighting section of the circle becomes smaller), fig. 2:

To keep the circle full (the full sircle representing the ideal exposure), this reduction of the lighting section has to be compensated by increasing one or more of the other sections. In fig. 2 I have increased the ISO-setting (section) and kept the apeture and exposure time (sections) unchanged. So if the available light is decreasing, you can for instance increase the ISO-setting (set a higher ISO value to make the sensor more sensitive to light) to obtain the same exposure result.

Say you now also want to make sure that you avoid unsharp images due to camera shake, so you opt for a shorter exposure time (faster shutter speed). The available light is still the same, and you stick to the same ISO-setting. If you then reduce the exposure time (section) the only option you’ve got is to increase the aperture (section) and thus increase the flow of light into the camera, fig. 3:

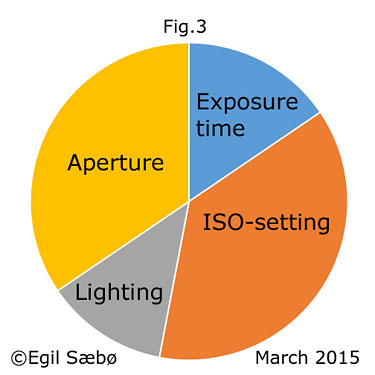
Again the FOURSEC explains the situation perfectly (fig. 3): To maintain the amount of light ideal for the exposure we have to increase the aperture (the opening, the flow of light) as the light will be flowing onto the sensor for a shorter period of time.

Please note that I by the term aperture refer to the physical size of the aperture, not the f/number as the latter would not work in this model as a larger f/number means less light through the lens!


Explaining how a photograph was taken
In addition to being a tool for understanding exposure as such, the FOURSEC can be used for visualizing the settings for a photograph when explaining how the picture was taken. See fig. 4 with pictures from the Atlantic Road in Norway:
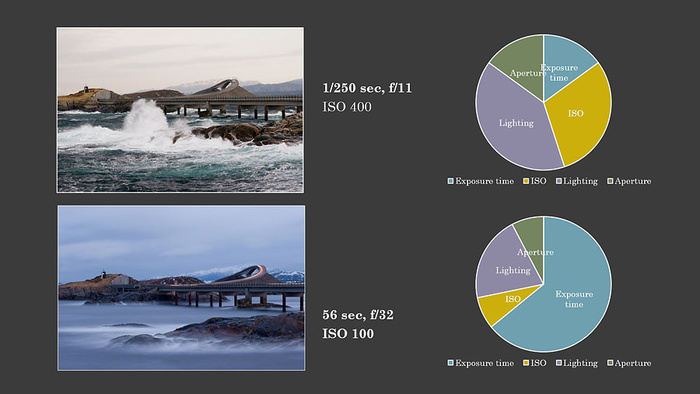


Fig. 4


The upper picture was taken on an overcast day around noon. To stop the motion of the waves I opted for a relatively short exposure time (1/250 sec.). I also wanted a great depth of field (DOF) and consequently chose aperture f/11(greater f-number gives greater depth of field, but a smaller physical aperture). Giving priority to a short exposure time, and a relatively small aperture, I had to increase the ISO to obtain the ideal exposure. (As the sun alone provided the available light for the landscape, I could not increase the lighting.)

The lower picture was also taken on an overcast day but this time in the afternoon. This means that the lighting was on the decrease, hence the smaller lighting section in the lower circle compared to the upper circle. In this picture I wanted to have light trails from the cars for the whole visible distance of the road. As the cars were in the frame for ca. 55 seconds, I had to use an exposure time a bit longer than this and opted for 56 seconds (with the camera on a tripod). This is a very long time for letting light into the camera, so to get the ideal exposure I had to narrow down the aperture as much as possible to strain the flow of light (f/32), and in addition I had to make the sensor very little sensitive to light (reduce the ISO setting considerably).

Use of filters included
What then if the lighting had been stronger (if the lighting section of the circle had been larger)? Say I was already using the smallest possible aperture on my lens, and the lowest possible ISO setting on my camera, so these section of the circle could not be made smaller. If there was more available light (a larger lighting section) I would then have to reduce the exposure time (section) and I would not have managed to capture light trails all the way in the photo. I could of course have waited until dusk, but there would actually have been an other way around the problem. Now the introduction of the lighting section becomes even more useful. If there is too much available light, you can simply apply a tool for reducing the available light. By fitting a neutral density filter (ND filter) to the front of the lens you can stop some of the light from entering the camera. And voilà, the lighting section is reduced, allowing you to increase the exposure time (section) enough to get those light trails all the way! You are suddenly able to control every single section of the circle, and the FOURSEC model explains it all.

Win some, lose some
Exposure is all about balancing or giving priority to settings, about winning some and losing some. What you win or lose are for instance: You win a larger depth of field (DOF) by decreasing the aperture (larger f/number), but you lose light and must compensate by using a longer exposure time and/or a lager ISO setting. The larger ISO setting you use in this situation the shorter exposure time you win. So by increasing the ISO you may regain the exposure time you had before decreasing the aperture, say if you want to both freeze action/movement and win a large DOF at the same time. By using a larger ISO setting, however, you lose technical image quality, so this setting should be balanced to what other kinds of quality you want to win or lose in your picture, i.e. DOF or sharpness of moving objects. (When increasing the ISO setting the camera turns up the light volume electronically, and noise from the system will show in the image (grain and colour specks). You will also have photos with less detail in them as they actually will be underexposed at the outset.)

It is important to note that the sections in the FOURSEC model cannot be compared to each other mathematically. The model does not work like a traditional statistics pie with sections derived from calculations based on one specific entity. Exposure times are measured in seconds. Apertures as such are measured in millimetres, and the value representing the camera’s sensitivity to light is, well ISO. Thus the FOURSEC is to be applied and read only as a symbolic reference to the lighting conditions and the camera settings.

The Exposure Triangle explained by a Circle

Egne prosjekter, Fototeknikk, Fototeori

Introducing the Four Section Exposure Circle

This post was updated 25 May 2015. I now use the term exposure time synonymous with shutter speed as exposure time corresponds better to the principles of the model.

Having worked as a photography teacher for many years I have tried out different methods for teaching my students the basics of photography. Like so many others I have often referred to, and have had some success with, the exposure triangle. An other model that has come in handy is the analogy of filling cups of different sizes (ISO-settings) with water (light) from a tap with different openings (apertures) within a certain period of time (exposure time/shutter speed), the water pressure in the pipe representing the available light.

Nevertheless, I have missed a model that could explain it all in one go, visually. That’s why I recently ended up developing the four section exposure circle (let’s name it FOURSEC for short). I don’t know if anybody else has done it. After I came up with the idea I’ve searched the internet for the same concept. So far I’ve only found a few other photographers that operate with a circle as a tool for explaining exposure, albeit all of them divide their circle, or «pie», into three sections representing the three settings that we find in the traditional exposure triangle: the ISO-setting, the aperture and the shutter speed (exposure time in my model).

In my FOURSEC, however, I have added the value of lighting. Thus my model includes the available light as a part of the picture (pun intended). This is nothing new when it comes to exposure, of course, and we find this value also in the «water-tap analogy», and probably also in other analogies and explanations. The big difference is that my model links the value of lighting to the three settings of the exposure triangle in one single visual presentation. After all, the available light will be the basic value in all photography situations and our choices for the three settings are always (if we cannot control the light) determined by it.

I believe the FOURSEC offers valuable help to beginners as it connects the exposure triangle settings directly to the actual photography situation. As the circle has to remain complete all the time, the model clearly shows that a change in the lighting necessitates an adjustment of at least one other setting, as well as allows for the adjustment of as many of the remaining settings as you wish. As a teacher I find this particularly beneficial when explaining the ISO-setting.

If the amount of light is decreasing, you can for instance increase the ISO-setting.

When reading fig. 1 and then fig. 2 we actually get a visual impression of the operation: the lighting section decreases while the ISO section increases. This visual impression should make the actual adjustment and the interaction of settings so much easier to understand and remember.Having increased the ISO-setting for operating in a darker environment, you might also want to reduce the exposure time to secure sharp images while working with your camera handheld. Now pretending that the sections representing lighting and ISO are fixed, the model tells us that in order to reduce the exposure time (section) we have to widen the aperture (section). Again the FOURSEC explains the situation perfectly (fig. 3).

Please note that I by the term aperture refer to the actual opening and its physical size, not the f/number as the latter would not work in this model as a larger f/number means less light through the lens!

As a photography teacher I see the advantage of including the available light in the model also in the sense that it helps students to see that there is no such thing as the one correct combination of settings, neither in itself nor for a certain lighting situation. And if one should wonder, more or less available light must lead to a change in one or more settings. These facts are obvious to the experienced. To the beginners they are not. I know. I teach them, and I have been asked questions over and over again that I know this model will help answer.

It actually surprises me that I’ve never thought of this model before, or never have seen it developed by someone else. At the same time it doesn’t surprise me that much. Experienced photographers know things too well to see the issues from the beginners’ point of view. We do not see the blank spots in our explanations as we’ve already got the complete picture in our minds.

In addition to being a tool for teaching/learning exposure as such, the FOURSEC can be used for visualizing the settings for a photograph when explaining how the picture was taken (fig. 4 below).


Fig. 4

It is important to note that the sections in the FOURSEC model cannot be compared to each other mathematically. The model does not work like a traditional statistics pie with sections derived from calculations based on one specific entity. Exposure time is measured in seconds. Apertures as such are measured in millimetres, and the value representing the camera’s sensitivity to light is, well ISO. Thus the FOURSEC is to be applied and read only as a symbolic reference to the lighting conditions and the camera settings.

I hope my Four Section Exposure Circle will be of help both to teachers and students of photography when facing the basic challenges of exposure.

See also this tutorial based on the model.